Efficient Management of Large Test Data for Nextflow Pipelines Using DVC and Custom GitHub Actions Runners
Introduction and tl;dr
At NEC OncoImmnunity, we write Nextflow workflows for our various projects. We have unit tests for processes and workflows using minimized input data, but we also need to run the workflows with full datasets to ensure they are working as expected. This is especially important when we release new versions of our pipelines. Bioinformatics datasets can be large, and we don’t want to have to download them for every single test run, as that would:
- slow down the tests leading to a bad developer experience
- cost a lot in terms of network traffic
The solution that we’ve landed on for this is to:
- Use DVC to manage test-data for our processes and workflows.
- Use a local cache directory to avoid having DVC download the data for every test run. This way the data is only downloaded once (the first time) and can later be reused. DVC then only needs to symlink in the correct data files from the cache and into the repository directory (which is created for the specific CI job).
- Use custom GitHub Actions runners with persistent file systems, so that the DVC cache directory sticks around.
The above works very well for us. To share how we do this, this blog post will take you through an example where we set up DVC and a Github Actions CI workflow to run a basic nextflow workflow. Let’s dive into the example!
Working through an example
We’ll use the nextflow hello world example (at revision afff16a9b45c8e8a4f5a3743780ac13a541762f8) to illustrate how to set this up.
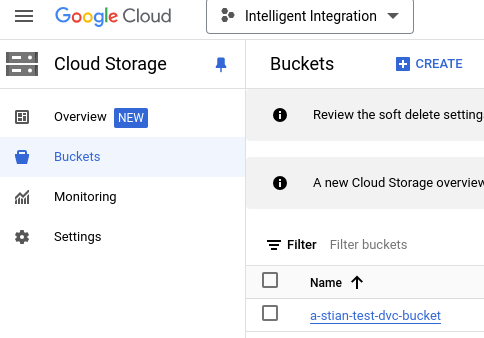
We’ll also need a remote storage that DVC can use to store files. For this example I’ll use a Google Cloud Storage bucket, but do note that DVC can work with several different kinds of storage backends, so you might want to use something else. I’ve created a bucket called a-stian-test-dvc-bucket (which will be deleted by the time you read this :). Why the “a-” prefix, do you ask? It’s so that my bucket will appear first in the bucket list in the Google Cloud Console, of course:

Alright, let’s get started:
- Clone the repository and checkout the specific commit:
git clone https://github.com/nextflow-io/hello.git
cd hello
git checkout afff16a9b45c8e8a4f5a3743780ac13a541762f8
- Setup a python environment and install DVC:
python3.12 -m venv venv
source venv/bin/activate
pip install 'dvc[gs]==3.56.0'
- Create a local cache directory:
# Create the directory as root, so that it can be shared by other users on the same machine:
sudo mkdir /home/shared/dvc-cache
The reason we create this directory as root, and at that location, is so that it may be shared by other users on the same machine. This is nice to have setup for the CI runners, but you can also just create it somewhere else and adjust the paths in the following steps.
- Initialize DVC:
dvc init
After running this, you should have the .dvc folder locally:
$ ls -ahl .dvc
Permissions Size User  Date Modified  Name
.rw-r--r--    26 stian 24 okt.  11:40 .gitignore
.rw-r--r--     0 stian 24 okt.  11:40 config
drwxr-xr-x     - stian 24 okt.  11:40 tmp
- Open the
.dvc/configfile and change thecachesection to point to your local cache directory, and add a remote pointing to your Google Cloud Storage bucket. The results should look like this:
$ cat .dvc/config
[cache]
    dir = /home/shared/dvc-cache
    shared = group
    type = symlink
[core]
    remote = myremote
['remote "myremote"']
    url = gs://a-stian-test-dvc-bucket
- At this point we are ready to add some (big) data and start using DVC to manage it. I’ve found an example .bam file from ENCODE that we can use for this demonstration:
mkdir data
wget -P data http://hgdownload.cse.ucsc.edu/goldenPath/hg19/encodeDCC/wgEncodeUwRepliSeq/wgEncodeUwRepliSeqBg02esG1bAlnRep1.bam
dvc add data/wgEncodeUwRepliSeqBg02esG1bAlnRep1.bam
The last command there should give you output like this:
$ dvc add data/wgEncodeUwRepliSeqBg02esG1bAlnRep1.bam
100% Adding...|██████████████████████████████████████████████████████████████████████████████████████████████████████████████████████|1/1 [00:00,  4.67file/s]

To track the changes with git, run:

        git add data/.gitignore data/wgEncodeUwRepliSeqBg02esG1bAlnRep1.bam.dvc

To enable auto staging, run:

        dvc config core.autostage true
Here DVC is informing us that it has added the file to its knowledge, by creating this .dvc file:
$ cat data/wgEncodeUwRepliSeqBg02esG1bAlnRep1.bam.dvc
outs:
- md5: 44c2a0c9df43fee5638e408138d9fce9
  size: 96089078
  hash: md5
  path: wgEncodeUwRepliSeqBg02esG1bAlnRep1.bam
This is the file that DVC will use to track the data. As you can see, it contains a hash of the file contents, the size of the file, and the path to the file. I like to add a description to the file, so that I know what the file is later on. Let’s modify the file to include a description:
$ cat data/wgEncodeUwRepliSeqBg02esG1bAlnRep1.bam.dvc
outs:
- md5: 44c2a0c9df43fee5638e408138d9fce9
  size: 96089078
  hash: md5
  path: wgEncodeUwRepliSeqBg02esG1bAlnRep1.bam
  desc: Example bam file from encode. Downloaded from http://hgdownload.cse.ucsc.edu/goldenPath/hg19/encodeDCC/wgEncodeUwRepliSeq/wgEncodeUwRepliSeqBg02esG1bAlnRep1.bam at 2024-10-24.
DVC also added an entry for this file in the .gitignore file, so that git doesn’t try to track it directly:
$ cat data/.gitignore
/wgEncodeUwRepliSeqBg02esG1bAlnRep1.bam
- We do however wish to track the DVC file with git, so that our version control system knows about it. Let’s add it:
git add data/wgEncodeUwRepliSeqBg02esG1bAlnRep1.bam.dvc
git commit -m "Add example bam file from encode"
- The next step now is to push the DVC-managed data to the remote store (and to the local cache directory):
dvc push
After this has succeeded, you should see that the file has been uploaded to the remote store, and that the local cache directory has been populated with the file:
$ ls -ahl /home/shared/dvc-cache/files/md5/44/c2a0c9df43fee5638e408138d9fce9
-r--r--r-- 1 stian users 92M okt.  24 12:19 /home/shared/dvc-cache/files/md5/44/c2a0c9df43fee5638e408138d9fce9

$ gsutil ls -ahl gs://a-stian-test-dvc-bucket/files/md5/44/c2a0c9df43fee5638e408138d9fce9
 91.64 MiB  2024-10-24T10:24:03Z  gs://a-stian-test-dvc-bucket/files/md5/44/c2a0c9df43fee5638e408138d9fce9#1729765443923966  metageneration=1
TOTAL: 1 objects, 96089078 bytes (91.64 MiB)
As you can see, the file has been uploaded to the remote store, and it’s also present in the local cache directory.
What we now have inside of our repository is just a symlink to the file in the cache directory:
$ ls -ahl data/wgEncodeUwRepliSeqBg02esG1bAlnRep1.bam
lrwxrwxrwx 1 stian users 66 okt.  24 12:19 data/wgEncodeUwRepliSeqBg02esG1bAlnRep1.bam -> /home/shared/dvc-cache/files/md5/44/c2a0c9df43fee5638e408138d9fce9
- We are now ready to actually use the .bam file in a test case. Let’s add a simple process that counts the number of reads in the bam file. I’ve modified the
main.nfandnextflow.configfiles like this:
$ cat main.nf
#!/usr/bin/env nextflow

process sayHello {
  input:
    val x
  output:
    stdout
  script:
    """
    echo '$x world!'
    """
}

process countReads {
  container 'biocontainers/samtools:v1.9-4-deb_cv1'

  input:
    path bamfile
  output:
    stdout
  script:
    """
    samtools view -c $bamfile
    """
}

workflow {
  Channel.of('Bonjour', 'Ciao', 'Hello', 'Hola') | sayHello | view
  Channel.fromPath('data/*.bam') | countReads | view
}
$ cat nextflow.config
process.container = 'quay.io/nextflow/bash'

docker.enabled = true
In the main.nf file, we have added a process that counts the number of reads in the bam file. We configured nextflow to use a docker container for this process, and we also enabled docker in the nextflow.config file.
Let’s run the workflow:
$ nextflow run main.nf
N E X T F L O W  ~  version 23.10.1
Launching `main.nf` [elated_wescoff] DSL2 - revision: 9abe6447cf
executor >  local (5)
[96/cf24ab] process > sayHello (2)   [100%] 4 of 4 ✔
[e0/e79ee1] process > countReads (1) [100%] 1 of 1 ✔
Hello world!

Hola world!

Bonjour world!

Ciao world!

1784867
If we look at the .command.run file that Nextflow created, we can see that it was able to figure out the location of the bam file in the cache directory, and thus judged that it needed to mount the whole /home directory into the container:
$ cat work/e0/e79ee18dadbac412e44ed94de63a5a/.command.run  | grep "docker run"
    docker run -i --cpu-shares 1024 -e "NXF_TASK_WORKDIR" -v /home:/home -w "$PWD" --name $NXF_BOXID biocontainers/samtools:v1.9-4-deb_cv1 /bin/bash -ue /home/stian/nextflow-dvc-testcase/work/e0/e79ee18dadbac412e44ed94de63a5a/.command.sh
Note the -v /home:/home there. We can also look at the nxf_stage() function to understand more:
$ cat work/e0/e79ee18dadbac412e44ed94de63a5a/.command.run  | grep "nxf_stage()" -A 5
nxf_stage() {
    true
    # stage input files
    rm -f wgEncodeUwRepliSeqBg02esG1bAlnRep1.bam
    ln -s /home/shared/dvc-cache/files/md5/44/c2a0c9df43fee5638e408138d9fce9 wgEncodeUwRepliSeqBg02esG1bAlnRep1.bam
}
The ln -s command here shows that Nextflow was able to find the file in the cache directory and create a symlink to it in the working directory for the process.
Alright, all good so far. What’s the next step? It’s to try to run this in a CI/CD pipeline. In this example we’ll use Github Actions, but the same principles should apply for any other CI/CD system.
- Add a Github Actions workflow file to the repository. I’ve added a file called
.github/workflows/ci.yml:
mkdir -p .github/workflows
touch .github/workflows/ci.yml
Here’s the content of the file:
name: CI
on: push

jobs:
  run-testcase:
    runs-on: self-hosted
    permissions:
      contents: read
      id-token: write
    steps:
      - name: checkout
        uses: actions/checkout@v4
      - name: Authenticate with Google Cloud. Required for DVC to pull data from Google Cloud Storage.
        uses: "google-github-actions/auth@v2"
        with:
          workload_identity_provider: ${{ secrets.GCP_WORKLOAD_IDENTITY_PROVIDER }}
          service_account: ${{ secrets.GCP_SERVICE_ACCOUNT }}
          token_format: "access_token"
      - name: Setup the python environment
        run: |
          python3.12 -m venv venv
          source venv/bin/activate
          pip install 'dvc[gs]==3.56.0'
      - name: Pull the DVC-managed data
        run: |
          source venv/bin/activate
          dvc pull
      - name: Setup Nextflow
        uses: nf-core/setup-nextflow@v1
        with:
          version: latest-stable
      - name: Run the testcase
        run: nextflow run main.nf
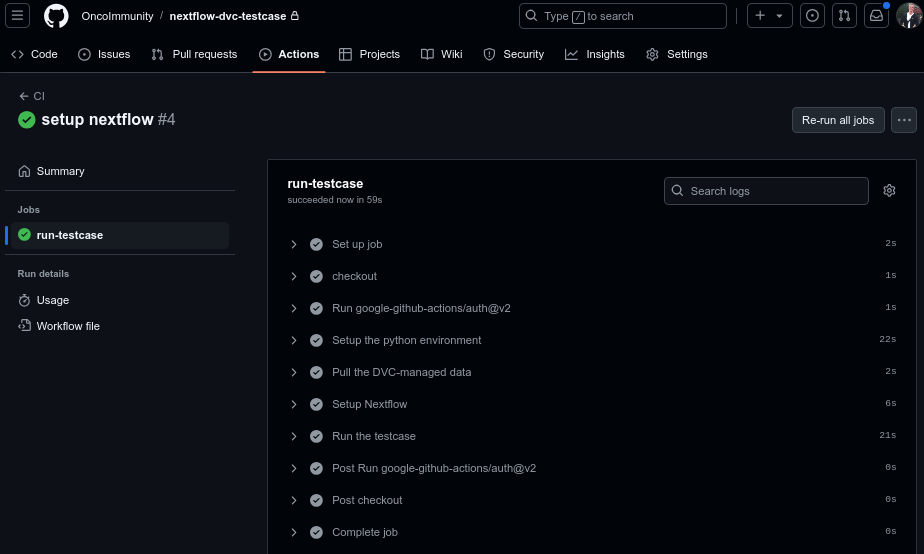
After pushing this to the repository, a github actions workflow run should be launched. Here is what mine looked like:

Let’s go through some important parts of the workflow file:
    permissions:
      contents: read
      id-token: write

...

      - name: Authenticate with Google Cloud. Required for DVC to pull data from Google Cloud Storage.
        uses: "google-github-actions/auth@v2"
        with:
          workload_identity_provider: ${{ secrets.GCP_WORKLOAD_IDENTITY_PROVIDER }}
          service_account: ${{ secrets.GCP_SERVICE_ACCOUNT }}
          token_format: "access_token"
This permissions part is required for the authentication step to work. We authenticate with Google Cloud using Workload Identity Federation, and this requires the permissions to read and write the id token which are stored as secrets in the github organization. Secrets can be set both on the organization and repository level, so choose what fits your use case best. The step shown is where we do the authentication.
      - name: Setup the python environment
        run: |
          python3.12 -m venv venv
          source venv/bin/activate
          pip install 'dvc[gs]==3.56.0'
      - name: Pull the DVC-managed data
        run: |
          source venv/bin/activate
          dvc pull
Next we setup the python environment, install DVC, and then in the next step pull the DVC data. If you look closely at the above screenshot, you can see that the “Pull the DVC-managed data” step took 2 seconds. This is because the data was already present in the local cache directory, so DVC didn’t have to download anything. DVC only had to create a symlink to our bamfile.
      - name: Setup Nextflow
        uses: nf-core/setup-nextflow@v1
        with:
          version: latest-stable
      - name: Run the testcase
        run: nextflow run main.nf
In the final two steps we use this github action to setup Nextflow, and then we run our testcase.
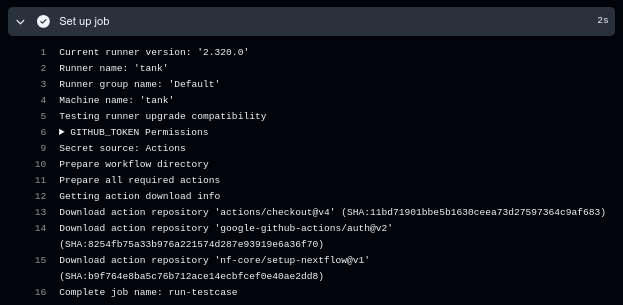
One more thing to note is that this workflow runs on one of our custom runners. This can be seen if we look at the logs from the “Set up job” step:

Note the “Runner name: ‘tank’” in the output there. This is one of our custom runners which runs Ubuntu with a bunch of default packages installed (although lacking nextflow, which is why we installed it specifically in the workflow).
If I now SSH into this custom runner, I can verify that the DVC cached file is present at the same location:
stian@tank:~$ ls -ahl /home/shared/dvc-cache/files/md5/44/c2a0c9df43fee5638e408138d9fce9
-r--r--r-- 1 ghworker ghworker 92M Oct 24 13:08 /home/shared/dvc-cache/files/md5/44/c2a0c9df43fee5638e408138d9fce9
This means that the next time this runner is used, anyone who depends on this file (with the same hash) will be able to find the file in the cache directory, avoiding the need to download it.
Summary and Conclusions
In this post, we’ve seen how to efficiently manage large test data for Nextflow pipelines using DVC and custom GitHub Actions runners. The key components of this approach are:
- Faster CI/CD pipelines: By caching data locally, we significantly reduce the time spent downloading large datasets for each test run.
- Reduced network costs: Minimizing repeated downloads of large files leads to substantial savings in network transfer costs.
- Version control for test data: DVC allows us to track changes to our test datasets over time, improving reproducibility.
- Scalability: This method can easily accommodate multiple large datasets, making it suitable for complex bioinformatics projects.
By combining DVC, local caching, and custom GitHub Actions runners, we’ve created a robust and efficient system for managing large-scale bioinformatics test data in CI/CD pipelines.
We hope this guide proves useful for others facing similar challenges in bioinformatics workflow testing. If you have any questions or comments, please reach out on Mastodon (see the link in the sidebar).
Interested in tackling exciting bioinformatics projects? NEC OncoImmunity are always looking for talented individuals to join the team. Get in touch to learn more about opportunities to work with us!